
Easy Chocolate Mirror Glaze Cake Recipe Tutorial
Mirror glaze cakes boast lustrous frosting, cream layers, and mousse filling. They exude sophistication. This transforms the humble chocolate cake into a stunning centerpiece, perfect for any celebration.
This easy chocolate mirror glaze cake recipe tutorial demystifies, creating a glossy finish. It uses frosting, glazes, cream, and mousse. This proves that a professional look is achievable for bakers at all skill levels.
The versatility of mirror glazes and frosting techniques is remarkable. They include garage and leaf gelatine. This allows adorning a range from decadent mousse cakes to simple layered confections. It ensures your dessert impresses in both appearance and taste.
Creating mirror cakes with shiny glaze becomes an achievable delight with this guide. These cakes are ready to grace your platter. Master the frosting techniques and glaze recipes. This ensures your frosting melts into a perfect finish.
Chocolate Mirror Glaze Cake Recipe
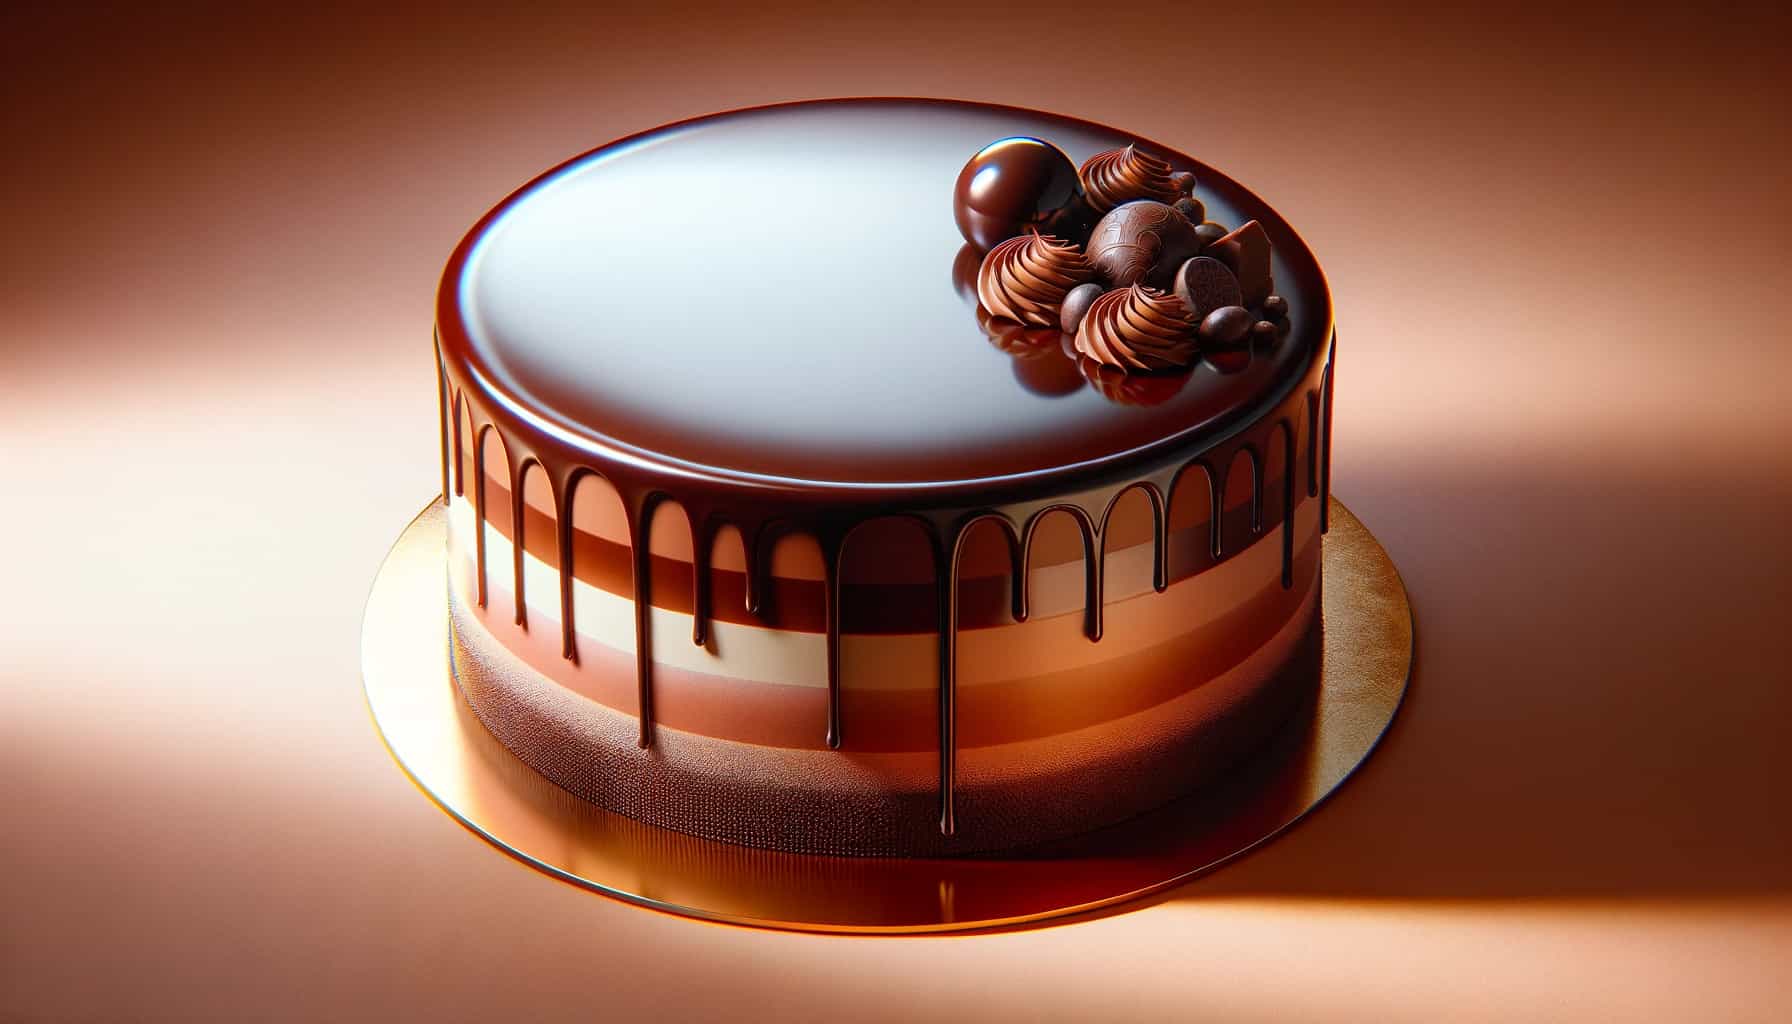
Indulge in the luxurious world of pastry with our Chocolate Mirror Glaze Cake – a decadent, elegant dessert that combines deep chocolate flavors with a stunning mirror-like finish!
Serves: 8-10 people
Prep Time: 1 hour
Cook Time: 30 minutes
Total Time: 3 hours 30 minutes (including cooling and setting time)
Resting Time: 2 hours
Type of Meal: Dessert
Origin: A modern twist on traditional French pastry
Diet: Vegetarian (contains dairy and eggs)
Equipment Needed:
- Wire rack
- Immersion blender
- Round cake tin
- Large and small bowls
- Small saucepan
- Medium saucepan
- Silicone mold
- Baking sheet
- Serrated knife
- Stand mixer
- Fine mesh sieve
- Cake Board
- Plastic wrap
Ingredients:
- Chocolate cake layers:
- Your preferred chocolate cake recipe
- Mirror glaze:
- 200g granulated sugar
- 75ml water
- 150g sweetened condensed milk
- 150g milk chocolate, finely chopped
- 100g cocoa butter
- 15g gelatin powder (unflavored)
- 90ml water (for gelatin)
- Chocolate mousse:
- 150g milk chocolate
- 250ml heavy cream
- 2 egg yolks
- 40g sugar
Instructions:
- Bake the Cake:
- Bake your chocolate cake in prepared pans. Allow to cool on a wire rack.
- Make the Chocolate Mousse:
- Melt the milk chocolate over a bowl of hot liquid. Whip cream to soft peaks in a separate bowl. Beat egg yolks and sugar until light and creamy. Fold in melted chocolate, then gently fold in whipped cream. Set aside in the fridge.
- Assemble the Cake:
- Trim the tops of the cakes for a flat surface. Layer with chocolate mousse, using a spatula to smooth out. Wrap it with plastic wrap and freeze it for an hour.
- Prepare the Mirror Glaze:
- Soak gelatin in cold water. Heat sugar, water, and condensed milk on medium heat. Add the soaked gelatin and then pour over milk chocolate and cocoa butter. Blend until smooth—strain with a fine mesh sieve.
- Glaze the Cake:
- Set the frozen cake on a wire rack over a baking sheet. Pour the glaze over the cake, completely covering the sides and top. Let the excess glaze drip off. Chill to set.
- Final Touches:
- Carefully place the cake on a serving plate. Use a hot knife to clean any drips from the bottom edge.
Notes:
- Ensure all ingredients, especially chocolate, are high-quality for the best flavor and glaze.
- Maintain the glaze at the right temperature for a smooth application.
- The cake can be refrigerated for up to 3 days.
- This cake is perfect for special occasions and can be decorated with chocolate shavings or edible gold leaf for an extra touch of elegance.
- Enjoy experimenting with this recipe, perhaps adding a layer of chocolate ripple biscuits or a different type of chocolate for the mousse.
Galaxy Mirror Glaze Cake Recipe
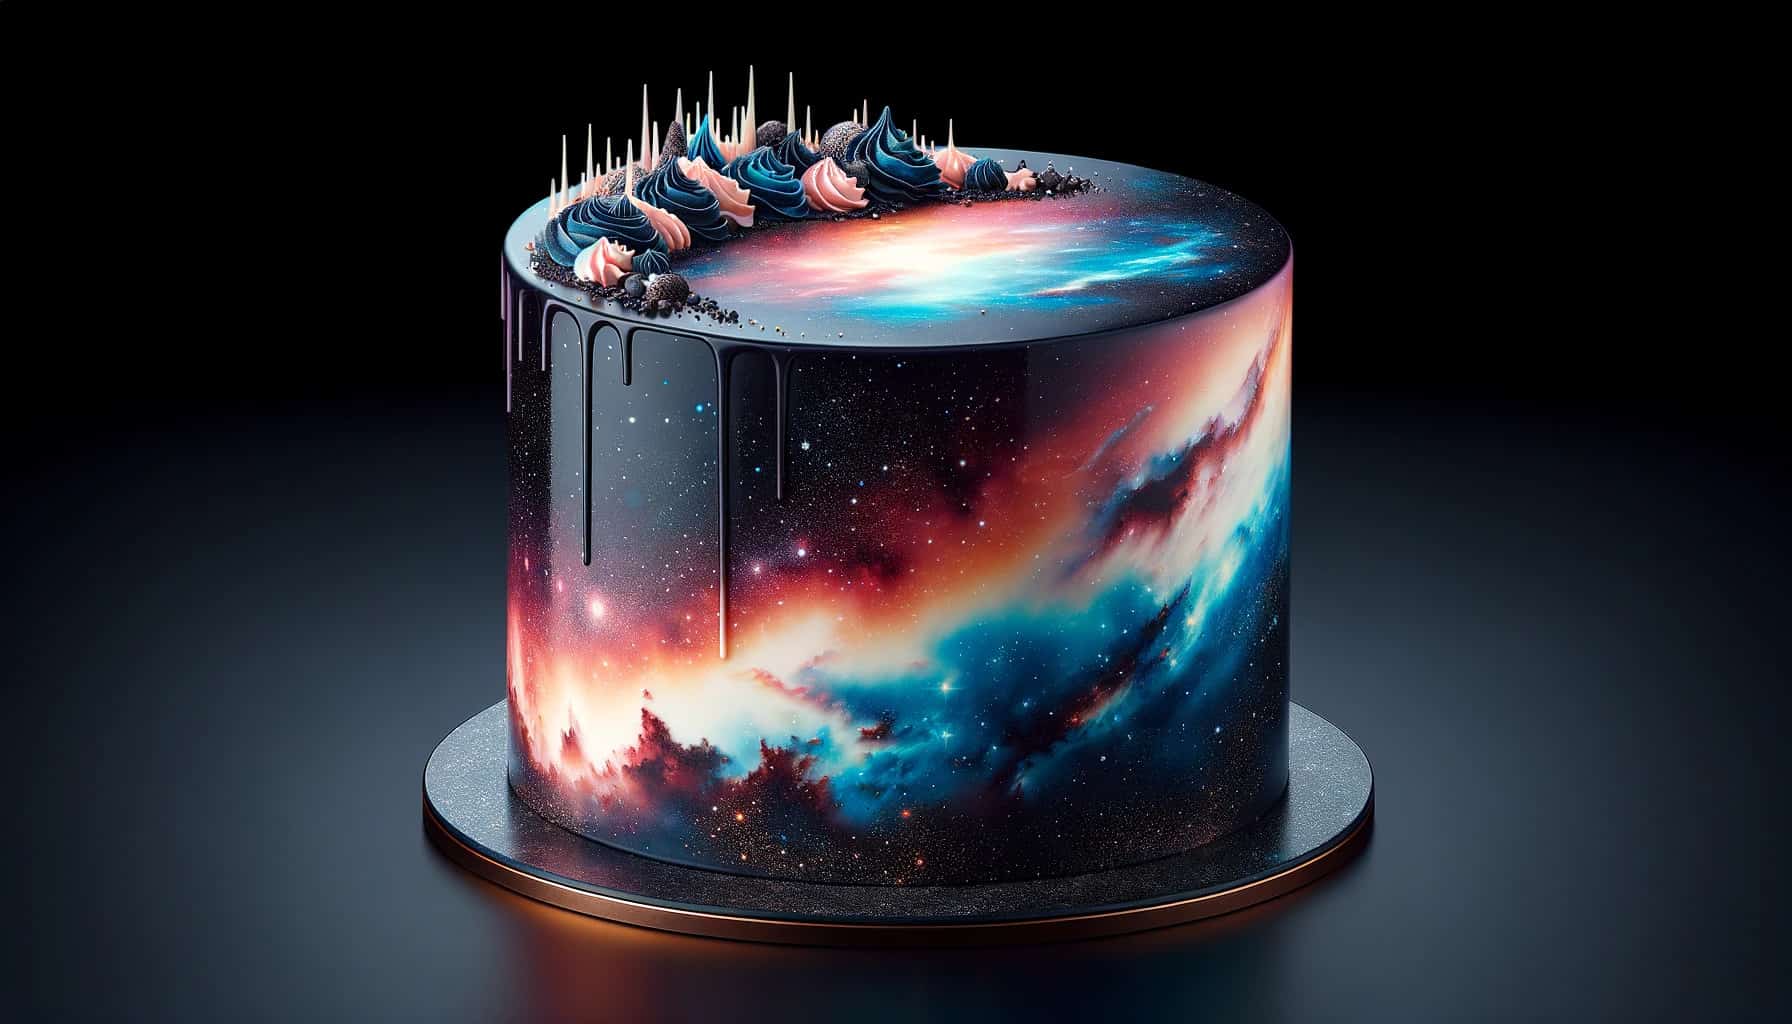
Discover the magic of French haute pastry with our Galaxy Mirror Glaze Cake – a dazzling dessert feast for both the eyes and the palate!
Serves: 8-10 people
Prep Time: 1 hour
Cook Time: 45 minutes
Total Time: 3 hours 45 minutes (including cooling and setting time)
Resting Time: 2 hours
Type of Meal: Dessert
Origin: Inspired by French haute pastry traditions
Diet: Vegetarian (contains dairy and eggs)
Equipment Needed:
- Wire rack
- Immersion blender
- Cake pan (round cake tin)
- Large and small bowls
- Small saucepan
- Medium saucepan
- Silicone mold
- Baking sheet
- Serrated knife
- Stand mixer
- Fine mesh sieve
- Cake Board
- Plastic wrap
Ingredients:
- Vanilla cake layers:
- Your favorite vanilla cake recipe
- Mirror glaze:
- 300g granulated sugar
- 150ml water
- 200g sweetened condensed milk
- 300g white chocolate chips
- 19g gelatin powder (unflavored)
- 100ml water (for gelatin)
- Edible food coloring (different colors)
- White chocolate mousse:
- 200g white chocolate
- 300ml heavy cream
- 3 egg yolks
- 50g sugar
Instructions:
- Bake the Cake:
- Prepare your favorite vanilla cake recipe in prepared cake tins. Once baked, let them cool on a wire rack.
- Make the White Chocolate Mousse:
- Melt white chocolate in a bowl over hot liquid. In a separate bowl, beat egg yolks and sugar until creamy. Fold in the melted chocolate and whipped cream. Chill for later use.
- Assemble the Cake:
- Use a serrated knife to trim the tops of the cake layers for a flat surface. Place the first layer on a cake board, cover it with white chocolate mousse, and repeat with the remaining layers. Cover the whole thing with a crumb coat. Freeze for an hour.
- Prepare the Mirror Glaze:
- Soak gelatin in a bowl of cold water. Heat sugar, water, and condensed milk in a medium saucepan to medium heat. Add the soaked gelatin and pour over white chocolate chips, stirring until melted. Use an immersion blender for a smooth mixture. Strain through a fine mesh sieve.
- Color the Glaze:
- Divide the glaze into separate bowls, coloring each with different colors. Cool to the proper working temperature (about 30°C).
- Glaze the Cake:
- Place the frozen cake on a wire rack over a baking sheet. Pour the glazes over the cake in a circular motion, creating a marbled effect. Let the excess glaze drip off. Chill in the fridge to set the ice.
- Final Touches:
- Once the glaze is set, carefully transfer the cake to a serving plate. Use a hot knife to clean the bottom edges.
Notes:
- For the best results, ensure all ingredients are at room temperature (except where noted).
- Experiment with different colors for the glaze to create your unique galaxy effect.
- The cake can be stored in the refrigerator for up to 3 days.
- This recipe is a great show-off cake for special occasions and an excellent introduction to the French tradition of Haute pastry.
- Enjoy exploring new recipes and different ways to decorate your galaxy mirror glaze cakes!
Dark Cakes Work Best
When you’re aiming for that wow factor, contrast is essential. Dark-colored cakes, particularly chocolate ones, are ideal partners for the reflective sheen of a mirror glaze. They provide a visually striking backdrop that makes the glaze pop.
- Chocolate cakes offer a rich depth of color.
- Contrast enhances the mirror effect visually.
Chill Before Glazing
Patience is not just a virtue; it’s a necessity in baking! Your frosted cake must be well-chilled before you even think about pouring on that glossy glaze. This ensures the ice sets quickly upon contact, maintaining its mesmerizing shine.
- Frozen cake holds up better under the warm glaze.
- Chilling prevents the frosting from melting into the glaze.
Embrace Creative Shapes
Don’t box yourself in—Creativity is your best pal! Experiment with different shapes and sizes to give your glazed masterpiece an edge in presentation. Whether round elegance or square chicness, each profile offers unique reflections and angles for your shiny topping.
- Round cakes provide smooth curves for reflection.
- Square cakes create interesting angular reflections.
In crafting a chocolate mirror glaze cake, remember these golden rules. Smooth frosting provides the best base. Dark cakes offer a captivating contrast. Chilling is non-negotiable.
Creativity in shape amplifies the cake’s allure. The right palette of techniques will elevate your creation from delicious dessert to confectionery artistry!
Troubleshoot Common Glazing Issues
Mirror glazes can make or break a cake’s appearance. Understanding how to fix common problems ensures a flawless, glossy finish.
Chill for Thickness
Is the glaze too runny? A simple chill can work wonders. The viscosity of your chocolate mirror glaze is crucial for that perfect coat. If the ice melts off the sides of your cake, it’s likely too thin. Here’s what you do:
- Place the ice in the refrigerator.
- Check every 5 minutes until desired thickness.
A cooler glaze clings better and prevents those pesky drips that ruin the mirror effect.
Pop Those Bubbles
Air bubbles are like uninvited guests at a party – nobody wants them there. They create blemishes on an otherwise smooth surface. But don’t fret; they’re easy to handle:
- Use a toothpick to burst each bubble gently.
- Alternatively, sweep a flame quickly over the surface.
This should give you that pristine, glass-like sheen without any unwanted texture.
Even Pouring Technique
Streaks on your cake are as unwelcome as rain on a parade. They often occur due to uneven pouring or temperature issues with the glaze itself. To avoid these blemishes:
- Pour steadily and evenly from the center.
- Keep your ice at a consistent temperature throughout.
Consistency is key here – both in motion and heat management.
Strain for Clarity
Cloudiness can obscure the reflective beauty of your mirror glaze cake. Sometimes, impurities are to blame, making your masterpiece look less than perfect. Double straining could be your savior:
- Pour through a fine-mesh sieve once.
- Repeat if clarity isn’t achieved after the first strain.
This extra step ensures all those tiny particles are caught before they mar your cake’s surface.
By addressing these common hiccups with precision and care, you’ll elevate not just the taste but also the aesthetics of your creations, leaving everyone mesmerized by their reflection in each slice!
Conclusion and Additional Inspirations
Reflecting on the journey of creating a stunning chocolate mirror glaze cake, it’s clear that precision and patience are key. Whether you’re a seasoned baker or trying your hand at this glossy delight for the first time, remember to follow each step carefully.
The techniques outlined—selecting the suitable cake base to master the glaze application—will help ensure your dessert tastes divine and boasts an eye-catching shine. Should any issues arise, revisit our troubleshooting section for quick fixes.
Now that you’ve mastered the basics, why not experiment with color variations or incorporate unique designs into your glaze? The possibilities are endless.
We encourage readers to share their creations and tips with fellow enthusiasts online, fostering a community of passionate bakers.
For those eager to expand their repertoire, consider exploring our other tutorials and recipes designed to elevate your culinary skills.
FAQs – Mirror glaze cake recipe
What is the best type of cake to use under a mirror glaze?
👉 The best type of cake under a mirror glaze is smooth and sturdy, such as a mousse cake, cheesecake, or a well-chilled buttercream-covered sponge cake. It should be able to hold up under the weight of the glaze without absorbing it. [verified]
How long does it take for mirror glaze to set on a cake?
👉 Mirror glaze typically begins setting within minutes after application due to its gelatin content, but it’s recommended to allow at least 2 hours in the refrigerator for complete setting before serving. [verified]
Can I make a mirror glaze ahead of time?
👉 Yes, you can make a mirror glaze ahead of time. Store it in an airtight container in the refrigerator for up to five days. Before using, gently reheat it over low heat until it reaches 35°C (95°F), stirring occasionally. [verified]
Can I use an alternative ingredient instead of gelatin for a vegetarian-friendly mirror glaze?
👉 Agar-agar is a vegetarian substitute for gelatin that can be used in making mirror glazes. However, remember that agar-agar sets differ from gelatin, so adjustments may need to be made regarding quantities and charging times. [verified]
Can I add flavors or colors to my chocolate mirror glaze?
👉 Absolutely! Before applying it to your cake, add oil-based flavors or food coloring gels to your chocolate mirror glaze mixture. Ensure they are well incorporated without overmixing, which could introduce air bubbles.
How do I achieve super shiny results with my chocolate mirror glaze?
👉 To achieve super shiny results with your chocolate mirror-glazed cakes, ensure all ingredients are properly measured and mixed without incorporating air bubbles; apply the warm (not hot) mixture immediately after straining onto a frozen cake; and chill promptly after application.
What tools do I need to apply mirror glaze effectively?
👉 For practical application of mi terror glaze, you will need:
- A tall measuring jug or blender jug for pouring.
- A fine-mesh sieve or strainer.
- An offset spatula.
- A thermometer.
- A turntable can also be helpful when spinning your cake and pouring the icing evenly around its surface.

Born and raised in a family of foodies, Georgia’s passion for cuisine was nurtured from a young age as she learned the intricacies of flavor and texture from her grandmother’s kitchen. As an adult, this early fascination blossomed into a full-fledged love affair with the culinary world.